Search for answers or browse our knowledge base.
-
Behaviour Scoring
-
- 1. Anxious in unfamiliar situations
- 2. Fear Of Noises
- 3. Fear of Novel Objects
- 4. Fear of Underfootings
- 5. Fear of Dogs
- 6. Fear of Stairs
- 7. Fear of Traffic
- 8. Separation Anxiety
- 9. Hyper-Attachment
- 10. Fear Of Strangers
- 11. Body Handling Concern
- 12. Retreats When Reached For
- 13. Harness Handle On Back Sensitivity
- 14. Avoidance Of Blowing Fan
- 15. Body Sensitivity To Object Contact
- 16. Anxious About Riding In Vehicles
- 17. Inhibited or passively avoidant when exposed to potentially stressful situations
- 18. Activated when exposed to potentially stressful situations
- 19. Excitable
- 20. Slow To Return To Productive Emotional State
- 21. Fidgety When Handler Is Idle
- 22. Fear On Elevated Areas, Drop-Offs Etc.
- 23. Barks Persistently
- 24. High Energy Level
- 25. Lacks Focus
- 26. Movement Excites
- 27. Chasing Animals
- 28. Dog Distraction
- 29. Sniffing
- 30. Scavenges
- 31. Inappropriate Behavior Around The Home
- 32. Lacks Initiative
- 33. Not Willing
- 34. Resource Guarding Toward People
- 35. Aggression Toward Strangers
- 36. Aggression Toward Dogs
- 37. Resource Guarding Toward Dogs Or Other Pets
- 38. Inappropriate Elimination While Working En Route
- 39. Socially Inappropriate Behavior With People
- 40. Inconsistent
- 41. Handler/Dog Team
- 42. Relationship Skills
- 43. Comparison 9 To 1 Score
- 44. Socially Inappropriate Behavior With Dogs
- 45. Thunder Reaction Prior To, During Or Immediately After A Thunderstorm
- 46. Kennels Poorly
- 47. Working Speed
- 48. Gait When Moving Out
- 49. Housebreaking Problems
- 50. Innate Desire To Work
- 51. Avoidance Of Exhaust From Vehicles
- Show all articles ( 36 ) Collapse Articles
-
-
-
Practice Videos
-
Behavior Testing
-
Database User Manual
-
-
-
- Adding a New Dog (using Manage Your Dog’s Data, MyDogs)
- Alerts
- BCL, Behavior Checklist
- Elbow Quick, Add new
- Estrus & Whelps
- Eye Quick
- Genetic Test Panel
- Genetic Test Quick
- Health Diagnoses Add/Edit
- Health History Report
- Health Normals, Add new
- Heart Quick
- Hip BVA, Add new
- Hip FCI, Add new
- Hip OFA, Add new
- Hip Penn Hip, Add new
- Photos PDFs etc.
- Private Notes
- Procedures, Add new
- Reminders
- Share my dog data to another organization
- Skin Quick
- Status History
- Weight - Entering a dog's weight
- ADI Public Access Test
- Hip Vezzoni, Add new
- Status Detail
- Edit or Change Call Name / Pedigree Name / Owner ID
- Add New Microchip / Delete Incorrect Microchip
- End Reasons
- Juvenile Estrus
- Communications Activities
- Incidents
- Show all articles ( 18 ) Collapse Articles
-
- Articles coming soon
-
-
-
-
- Alternate Therapy/Rehab
- Diagnostic Imaging, Add new / Edit or Delete
- Diet
- Elbow Quick, Add new / Edit or Delete
- Estrus & Whelps, Add new
- Eye Quick, Add new / Edit or Delete
- Genetic Test Quick, Add new / Edit or Delete
- Health Diagnoses, Add new / Edit (Update) or Delete
- Health History Report, Generate a PDF
- Health Normals
- Health Screening List
- Hip OFA Add new / Edit or Delete
- Hip Penn Hip Add new / Edit or Delete
- Hospitalization, Add new
- Kennel Tasks, Add new / Edit or Delete
- Lab, Add new / Edit or Delete
- Photos, PDFs, etc., Add new
- Reminders Add new / Edit or Delete
- Rx, Add new / Edit or Delete
- Semen Cryo, Add new / Edit or Delete
- Skin Quick Add new / Edit or Delete
- SOAP, Add new / Edit or Delete
- Status History
- Supplies Used, Add new / Edit or Delete
- Surgery, Add new
- Treatments Add new / Edit or Delete
- Vaccines Add new / Edit or Delete
- Weight and BCS Body Condition Score - Add new / Edit or Delete
- Hip Vezzoni, Add new
- Show all articles ( 14 ) Collapse Articles
-
-
-
-
Early Socialization
-
- Video - Coat Desensitization
- Video - Novel Objects
- Video - Trolley Ride with Mom
- Early Puppy Socialization - Novel Objects video
- Early Puppy Socialization – Novel Sounds video
- Early Puppy Socialization – Introducing New Environments video
- Early Puppy Socialization – Motor Development, Balance, Coordination, Proprioception video
- Early Puppy Socialization – Passive Environmental Enrichment in the Den video
- Early Puppy Socialization – Stairs
-
-
Genetic Selection & Inbreeding
-
- What are EBVs and how do they help?
- How EBVs are calculated
- What is needed to calculate EBVs and EBV accuracy?
- Using EBVs effectively
- Selection index
- Why are EBVs different for littermates?
- Presentation Recording: Improving behavior using EBVs
- Presentation Recording: Using EBVs successfully
- Presentation Recording - Improving health using EBVs
-
Webinars
-
Reproduction
-
Organization Management
ADI Public Access Test
0 out of 5 stars
| 5 Stars | 0% | |
| 4 Stars | 0% | |
| 3 Stars | 0% | |
| 2 Stars | 0% | |
| 1 Stars | 0% |
The purpose of the public access test is to help evaluate service/assistance dog team behavior in public and to ensure that dogs that have public access are
stable, well-behaved, and unobtrusive to the public.
Scoring:
- The team must score all “Always” or “Most of the time” responses on the A-M-S-N parts of the test
- The team must score at least 80% “yes” answers on the “yes” / “no” portion of the test.
- All quotations marked by an asterisk must be answered by a “YES” response.
To begin entering an ADI Public Access Test, follow steps on searching / selecting the dog with which you would like to add/edit their file.
Once the dog is selected, follow these steps…
1.Select the [Show Details] icon to the left of the dog’s name.
![]()
2. Select the [ADI Public Access Test] tab.
3. Select [Add new]
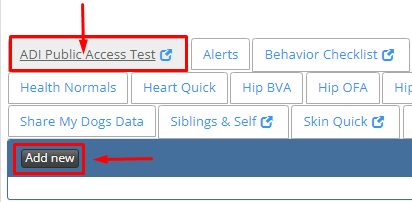
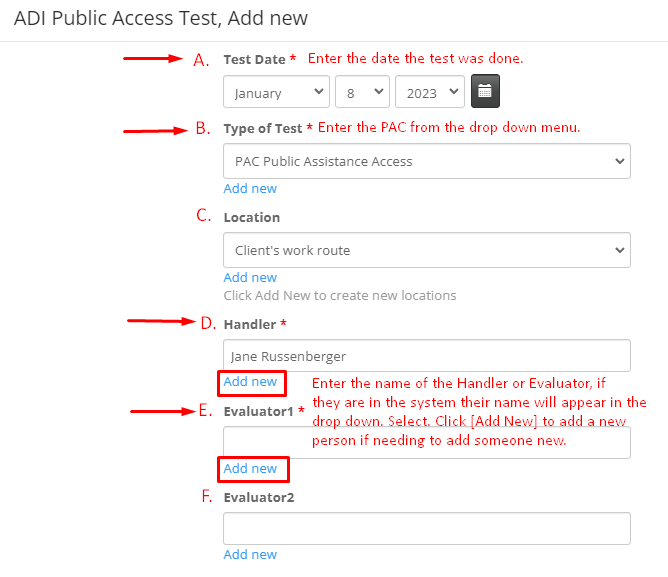
4. In the pop up window that appears, enter the testing details at the top of the form. Anything with an red asterisk is a required field. Other data is recommended to add if known.
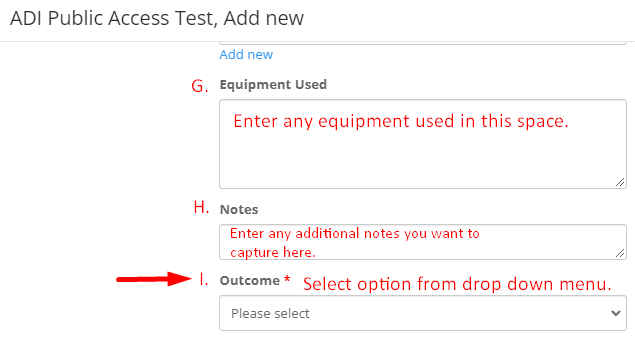
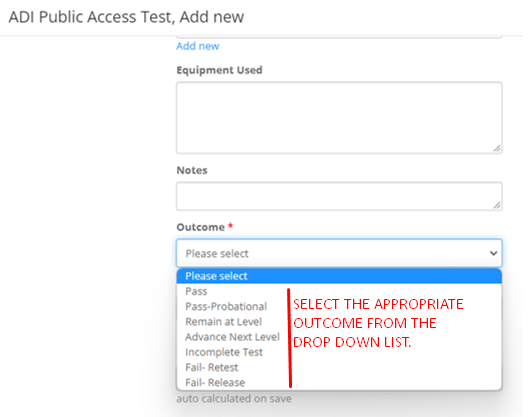
I. Outcome Select the appropriate outcome from the drop down list.
5. The next section you do not have to enter anything as they will auto calculate as you answer the questions in the next sections after saving.
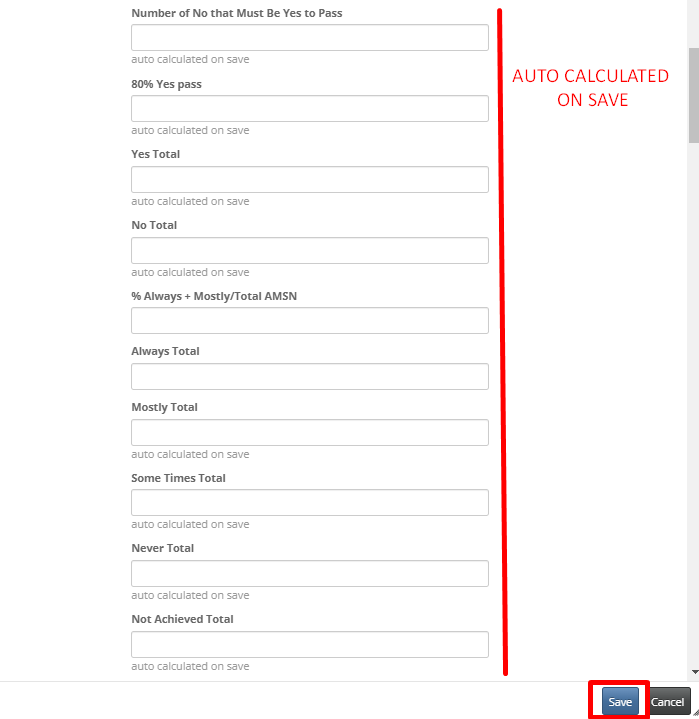
6. Next are 14 testing skills you will evaluate and score accordingly using the options available below the skill description. Select the most relevant to how the dog responds.
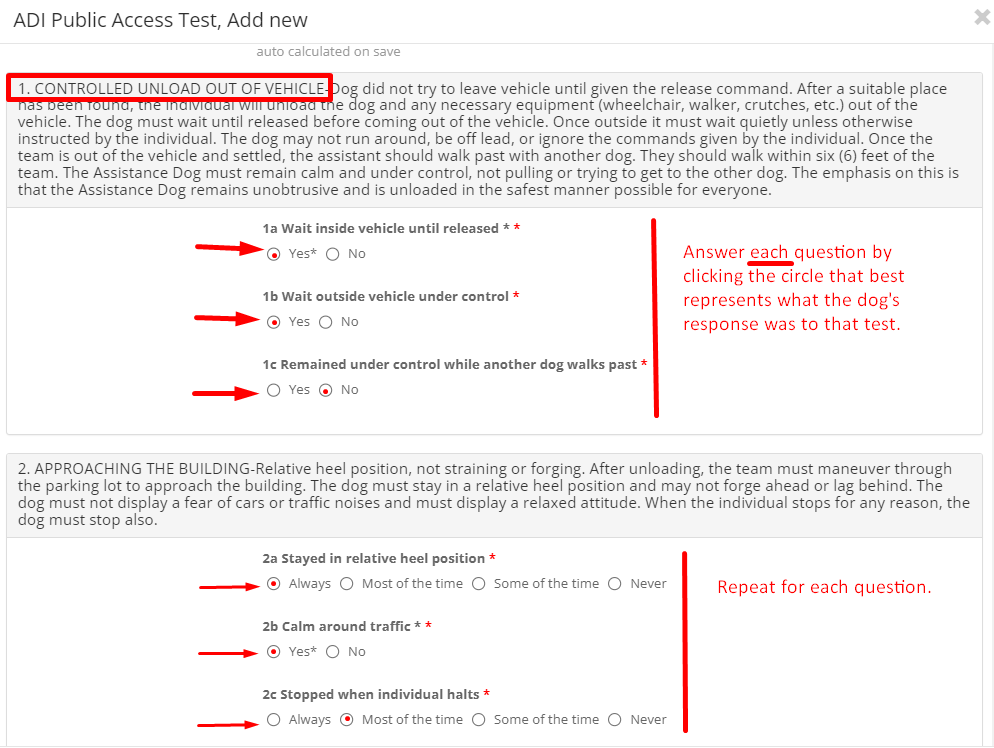
Repeat for each of the 14 questions.
7. At the bottom of the questions there are also two categories specifically for Service Dog Skills and Hearing Dog Skills. 16 skill tests in 6 cateragories for Service Skills, and 7 skill tests in 3 categories for Hearing Skills.

8. Once all skill tests are completed, click Save at bottom of page.

9. Once your Test is saved, you can see the test listed on the tabs page.
You can then click the table icon and add any Client Photos PDFs taken in relation to the test to review at a later date.
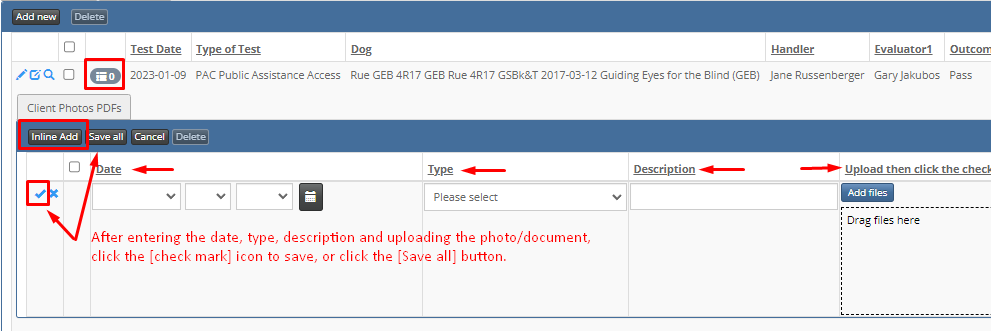
10. You can also Edit or Inline Add to edit errors recorded on the test.
Click the Edit (Pencil icon) to edit the testing results. This will create a pop up window where you can go through the questions again (like in #6). edit your answers as needed, then Click save at bottom of window to save your changes. You can also click the Inline Add (Box with pencil icon) to edit the answers that will open the line to show your answers. Edit answers as needed and click the check mark, or Save all to save your changes.
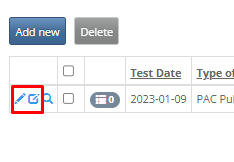
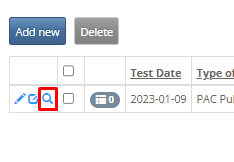
11. You can also view the record. Click the View Record icon (magnifying glass). A pop up window will appear with an easy to read document of your test results.
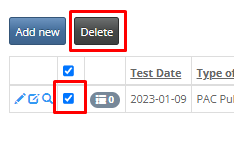
12. Delete a test – check the box to the right of the View record icon, this will activate the Delete button. Click Delete button, then click OK to verify you want to delete the test.
0 out of 5 stars
| 5 Stars | 0% | |
| 4 Stars | 0% | |
| 3 Stars | 0% | |
| 2 Stars | 0% | |
| 1 Stars | 0% |
